

Short answer: Most DIY AC guides stop at filter swaps and breaker flips, but savvy Las Vegas homeowners deserve more precision. In this post, you’ll learn how to use three budget-friendly diagnostic tools—a handheld infrared thermometer, a digital manometer, and a smartphone thermal camera—to gather actionable data rather than guessing at problems. You’ll see exactly where airflow is blocked, whether your refrigerant charge is off, and if hidden electrical hotspots threaten your system’s reliability. Armed with these measurements, you can decide when a quick fix is sufficient and when to call our EPA-certified technicians at The Cooling Company for AC Repair in Las Vegas. Let’s dive in and turn your intuition into real numbers.
1. Infrared (IR) Thermometer Diagnostics
Tool closer look: A handheld IR thermometer, like the Etekcity 774 (~$25), offers ±2% accuracy from –58°F to 716°F. Its distance-to-spot ratio (12:1) ensures you can safely scan coils, motors, and registers without touching hot surfaces.Measuring Delta-T (ΔT)
ΔT—the temperature drop between return and supply air—is the simplest performance metric. Place the IR thermometer probe at the return-air grille mid-cycle, record the temperature, then measure the supply register 12–18 inches away. A healthy central system yields a 15–20°F ΔT. Readings below 10°F warn of airflow restrictions or refrigerant undercharge.Condenser Coil Performance
Scan the outdoor condenser fins in the middle of a cooling cycle. Uniform thermal bands of 80–100°F indicate clean coils. Cold or hot spots suggest bent fins, dirt buildup, or blocked passages. Targeted fin straightening and coil cleaning can restore full heat rejection.Electrical Hotspot Detection
Aim the IR gun at motor housings, capacitor terminals, and contactor coils. Look for 10–15°F above ambient—signs of friction, loose wiring, or failing components. In one Las Vegas case, a homeowner logged an 8°F ΔT; IR scanning revealed a frosted coil segment hidden behind insulation. After a professional refrigerant recharge and fin realignment, ΔT rebounded to 18°F and energy usage dropped 12%. Safety Tips: Wear eye protection when scanning shiny surfaces. Maintain the manufacturer’s recommended distance for accurate readings. Always repeat scans post-adjustment to verify uniform thermal profiles. For basic airflow troubleshooting, revisit AC Not Blowing Hard? Discover Causes Behind Low Airflow. External Resource: U.S. Department of Energy – Using Infrared Thermometers for Home Energy Audits2. Digital Manometer for Static Pressure Testing
Instrument Spotlight: A digital manometer such as the Testo 510i (~$40) measures inches of water column (in. W.c.) to 0.01 precision. Accurate static-pressure readings reveal ductwork and filter restrictions invisible to the naked eye.Probe Placement & Zeroing
Install one hose into the return-plenum pressure tap and the other into the supply-plenum tap. Before powering the AC, press the zero button to calibrate. Run the system at full cool for two minutes to stabilize airflow.Interpreting Results
- Total Static Pressure: Sum of return and supply readings—should stay below 0.5 in. W.c. Higher values cost you 10–20% of cooling capacity.
- Return-Side Pressure: Over 0.3 in. W.c. Suggests clogged filters, crushed flex duct, or blocked returns.
- Supply-Side Pressure: Over 0.3 in. W.c. Points to closed registers, undersized ducts, or disconnected branches.
Pro Scenario
In a Henderson apartment complex, tests showed 1.2 in. W.c. Total pressure. A collapsed attic trunk line and clogged media filter were the culprits. Re-insulating the trunk and upgrading to MERV-13 filters reduced static to 0.4 in. W.c.—restoring airflow and cutting runtime by 15%. Best Practices: Place probes at least 48” from bends or takeoffs to avoid turbulence. Record readings before and after filter changes to quantify improvement. If static remains high, schedule a professional duct and airflow assessment. Before advanced diagnostics, ensure basic fixes are in place: 5 Quick DIY Fixes & When to Call. External Resource: ENERGY STAR® – Ductwork Sealing Guide3. Smartphone Thermal-Camera Scanning
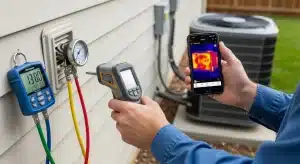
Comparative Review: FLIR One (~$200) and Seek Reveal (~$250) attach to your phone via Lightning or USB-C. Both deliver 80×60-pixel thermal sensors, color palettes, and app-based spotmeter readings.Outdoor Cabinet Inspection
Scan the condenser housing to find overheating compressor windings (10°F+ above ambient) or seized fan motor bearings (localized heat spots). Early detection avoids costly compressor replacements—$1,200–$2,500 in retail parts.Indoor Control-Board Analysis
Open the furnace or air-handler panel and scan the contactor, relays, and control board. Temperatures over 120°F signal worn contacts or failing relays. One Vegas homeowner caught a 135°F hotspot on a relay—replacing it saved an $800 compressor burnout.Duct Insulation & Leak Detection
Scan exposed trunks in attics and crawlspaces. Missing insulation shows as thermal gradients; leaks appear as cold air plumes. Targeted sealing with foam or mastic can recover 10–15% of lost efficiency. Safety Note: Maintain at least 6 in. Distance from live electrical parts and never rely solely on thermal images—verify with multimeter testing. For a complete AC playbook, see AC Troubleshooting: The Ultimate Homeowner’s Guide.4. Combining Data for Precision Diagnosis
The real power emerges when you correlate infrared ΔT, static-pressure readings, and thermal-camera hotspots. Here are three expert scenarios:- Scenario A: ΔT = 8°F, static = 1.0 in. W.c., uniform thermal cabinet—indicates airflow restriction. DIY fix: filter swap & duct clearing.
- Scenario B: ΔT = 18°F, static = 0.4 in. W.c., 130°F hotspot on contactor—suggests electrical or relay failure. Call pro: component replacement.
- Scenario C: ΔT = 12°F, static = 0.3 in. W.c., frost patches on coil & audible hiss—confirms refrigerant leak. Professional recharge & leak repair required.
5. Recognizing DIY Limits & Red-Flag Triggers
Even advanced tools have limits. Stop DIY and call The Cooling Company if you encounter any of these conditions:- ΔT remains below 10°F after filter and duct fixes
- Total static pressure above 1.0 in. W.c. Post-maintenance
- Electrical hotspots over 120°F on control panels or disconnects
- Refrigerant lines refreeze immediately after defrost
- Persistent, unusual noises during operation
- Mid-cycle shutdowns or safety-switch trips without clear cause
6. Why Professional Repair Saves You Money
Complex diagnostics and repairs risk warranty voids and safety hazards. Our licensed technicians deliver:- Precision Refrigerant Service: EPA-compliant gauges and leak-detection dyes ensure exact charge and no environmental harm.
- OEM Replacement Parts: Genuine capacitors, contactors, motors, and compressors for reliable performance.
- Comprehensive Maintenance Plans: Biannual tune-ups timed for spring and fall boost efficiency by up to 15% and extend equipment life by 30%.
- Insured Workmanship: Liability coverage for accidental damage or injury during service visits.